A Task dialog is more advanced than a message box,
but less complicated than a custom dialog. You generally configure a
Task dialog using properties, but you can also add custom controls if
desired. The Task dialog lets you communicate more information to the
user than a message box does, and it provides considerable flexibility.
Of course, you can't use it to replace custom dialog boxes. The Task
dialog is meant to fill the middle ground between message boxes and
custom dialog boxes. For example, many developers now use the Task
dialog for privilege elevation needs. The following sections describe
the Task dialog and show how to use it.
1. Using the Task Dialog Effectively
Creating a Task dialog is a
relatively simple process as long as you follow some basic rules. For
one thing, you need to keep the purpose of the Task dialog in mind. The
Task dialog was never meant to replace complex custom dialogs. It's also
overkill for very simple information presentation needs. You don't want
to replace your message boxes with Task dialogs because the Task dialog
will then lose its meaning and you'll have a less useful application. Figure 1 shows the Task dialog created by the Task Dialog example.
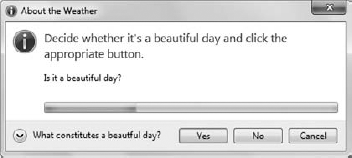
Notice that this dialog
includes an icon, just as any message box can, along with three standard
buttons: Yes, No, and Cancel. The Task dialog has a title and message
text within it. Of course, there are differences, too. If you could see
the dialog box in its original colors, you'd see that it has blue
instructional text. In addition, it uses a larger font size than the
message text. This dialog also includes details. Click the down arrow
and you'll see some additional information, as shown in Figure 2.
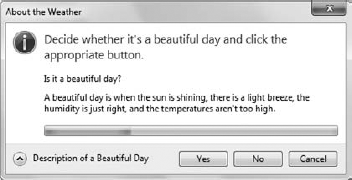
This Task dialog includes a
special feature, a progress bar. When time runs out on the progress bar,
the dialog box automatically makes a selection for the user. Using this
feature would let an application installation proceed using a default
setting, or any other wizard for that matter. Coding this addition is
easy because it's built right into the Task dialog. It's also possible
to force the user to make a decision. You can set a Task dialog to
disallow a cancel by the user. So you have both automation and concrete
required action at your disposal.
A Task dialog comes with
additional features not shown in the example. For example, you can add a
hyperlink to the dialog. When the user clicks the hyperlink, the Task
dialog passes control to the user's browser, where the user can obtain
additional information. It pays to spend a little time playing with the
Task dialog to obtain just the right appearance for your application.
The example doesn't
include any custom controls. You can add them, but doing so can be
tricky. There's no designer to help you, and you'll find that the number
of available controls is limited — just push buttons and radio buttons.
It's true that you can add a checkbox to the Task dialog's footer, but
you don't have any control over position and you get only one checkbox.
In short, the Task dialog does have limitations, just not as many as a
message box does. With this in mind, here are some typical uses of the
Task dialog (although you certainly shouldn't limit yourself to this
list):
2. Configuring the Task Dialog Example
The Task Dialog example
begins with a Windows Forms application. The example adds a button to
display the Task dialog. It requires use of the Code Pack. However, you
need to add only one DLL to the project, as shown here:
Microsoft.WindowsAPICodePack.DLL
You'll also need to add the following using statement to complete the configuration:
using Microsoft.WindowsAPICodePack.Dialogs;
3. Defining a Task Dialog
Because a Task dialog does
so much more than a message box can, you can't create it as a single
statement. As with many complex objects, you create the object first,
and then configure it as needed before displaying it on-screen. Listing 8-4 shows the code used to create the Task dialog shown earlier in Figures 1 and 2.
Example 1. Create the Task dialog
private void btnTest_Click(object sender, EventArgs e)
{
    // Create the Task dialog.
    TaskDialog TD = new TaskDialog();

    // Configure the Task dialog.
    // Allow the user to cancel.
    TD.Cancelable = true;

    // Set the caption.
    TD.Caption = "About the Weather";

    // Set the inner text.
    TD.Text = "Is it a beautiful day?";

    // Add standard buttons to the dialog box.
    TD.StandardButtons |= TaskDialogStandardButtons.Yes;
    TD.StandardButtons |= TaskDialogStandardButtons.No;
    TD.StandardButtons |= TaskDialogStandardButtons.Cancel;

    // Add an icon to the dialog box.
    TD.Icon = TaskDialogStandardIcon.Information;

    // Add instructions to the dialog box.
    TD.InstructionText =
        "Decide whether it's a beautiful day and " +
        "click the appropriate button.";

    // Add some details.
    TD.DetailsCollapsedLabel = "What constitutes a beautful day?";
    TD.DetailsExpanded = false;
    TD.DetailsExpandedLabel = "Description of a Beautiful Day";
    TD.DetailsExpandedText =
        "A beautiful day is when the sun is shining, there is a " +
        "light breeze, the humidity is just right, and the " +
"temperatures aren't too high.";

    // Set the host window.
    TD.OwnerWindowHandle = this.Handle;

    // Add a timing function so the user answers within
    // a specific interval.
    // Create the ProgressBar.
    TaskDialogProgressBar TimeIt =
        new TaskDialogProgressBar(0, 60, 0);

    // Add the ProgressBar to the dialog box.
    TD.ProgressBar = TimeIt;

    // Start the ProgressBar.
    TD.ProgressBar.State = TaskDialogProgressBarState.Normal;

    // Add a Tick event handler.
    TD.Tick += new EventHandler<TaskDialogTickEventArgs>(TD_Tick);

    // Display the Task dialog on-screen.
    TaskDialogResult Result = TD.Show();

    // Display the response on-screen.
    switch (Result)
    {
        case TaskDialogResult.Yes:
            MessageBox.Show("It's a beautiful day!");
            break;
        case TaskDialogResult.No:
            MessageBox.Show("The weather is bad.");
            break;
        case TaskDialogResult.Cancel:
            MessageBox.Show("The user didn't have an opinion.");
            break;
    }
}
|
The code begins by creating the TaskDialog object, TD. The constructor doesn't accept any input arguments.
The configuration process comes next. The Cancelable property lets you determine whether the user can cancel out of the dialog box. If you set Cancelable to false, the user can't click Cancel to exit the dialog box. Use the Caption and Text properties to set the same types of text that you normally associate with a message box. The Text
property accepts control characters, so you can format the output for a
pleasing presentation or simply let the text wrap from line to line as
needed.
You aren't
limited, as with a message box, to using certain combinations of
buttons. As shown in the code, you select each of the standard buttons
separately. Notice the technique shown in the code of working with the |=
(or-equal) operator. It isn't possible to "or" the buttons together in a
single line. For example, you can't use the following line of code:
TD.StandardButtons = TaskDialogStandardButtons.Yes ||
   TaskDialogStandardButtons.No || TaskDialogStandardButtons.Cancel;
NOTE
You can't use standard
buttons and custom buttons together. The code will compile, but the
dialog box will raise an error. In some cases, this limitation means
that you must provide custom versions of standard buttons to make the
application work properly.
Most dialogs include an icon of
some sort so the user knows what kind of dialog it is. The Task dialog
has access to the full complement of standard Windows icons, but you
can't create special icons for it. Assign the icon you want to the Icon property.
The next line of code shows one of the Task dialog special features. The InstructionText
property accepts a string value that provides basic instructions to the
user on what you want to happen next. The instruction text appears in
blue in the dialog box and in a larger font so it attracts the user's
attention immediately. You use the InstructionText
property for a Task dialog that requires user interaction, such as a
wizard or setup step, but you'd probably avoid using it for an
informational dialog box. Users will generally figure out that they need
to click OK to dismiss the dialog box after reading the message it
provides. This particular feature could lose its appeal if developers
begin overusing it for the wrong purposes, because the user will get
used to seeing it and start ignoring it.
Another important
Task dialog feature is detail information. The next section of code
shows how to set up a detail, and you have already seen the detail
displayed in Figure 8-8.
The detail text is there to help novice users who just don't understand
what the Task dialog is asking them to do. It helps alleviate the
problem of too much information, without leaving out information for
those who need it.
Many developers will miss the
next step, and the user will see a confusing assortment of icons on the
Taskbar as a result. You need to assign the Task dialog to the
application using the OwnerWindowHandle
property, or the user will see another icon added to the Taskbar. In
addition, if you don't assign the Task dialog to the application, the
user could simply ignore your request for additional information and
continue working with the application in other ways. In most cases, you
make the assignment using the this.Handle
property, unless you want to assign the Task dialog to a child window
(in which case, you need the handle to the child window instead).
The example includes code for a
progress bar. Unlike many add-on controls, the progress bar requires
special handling. You create the TaskDialogProgressBar object TimeIt, assign it to the TD.ProgressBar
property, and then perform configuration as needed. To make the
progress bar functional, you need to create an event handler for it. The
most common event to handle is Tick.
Once you complete the required configuration, it's time to call TD.Show(). The user's selection (when using standard buttons) appears in the output as a TaskDialogResult enumerated value (Result).
A production application would continue at this point with some level
of processing. The example merely displays the result of the user
selection (the state of the weather for the user).
4. Making an Automatic Selection
One of the problems with the
message box is that it doesn't provide automation. You can display it,
but that doesn't mean the user will ever figure out what to do next.
Most developers have seen it happen at least once — you get a support
call for a frozen application, only to find there's an open dialog box
that the user is ignoring. If you haven't encountered this little
user-support gem yet, you will. Fortunately, you can configure the Task
dialog to make an automatic selection for users who are seemingly
undecided, as shown in Listing 2.
Example 2. Handle ProgressBar events
void TD_Tick(object sender, TaskDialogTickEventArgs e)
{
    // Create a copy of the Task dialog.
    TaskDialog ThisTask = (TaskDialog)sender;

    // Don't do anything if the ProgressBar is paused.
    if (ThisTask.ProgressBar.State !=
        TaskDialogProgressBarState.Paused)

        // Check the current value.
        if (ThisTask.ProgressBar.Value == ThisTask.ProgressBar.Maximum)
        {
            // Pause if the time is up.
            ThisTask.ProgressBar.State =
                TaskDialogProgressBarState.Paused;

            // Automatically select a value.
            ThisTask.Close(TaskDialogResult.Cancel);
        }
        else
            // Update the ProgressBar value.
            ThisTask.ProgressBar.Value += 1;
}
|
Unfortunately, you can't set
the tick interval for a Task dialog. The tick occurs at a
200-millisecond interval. Consequently, the maximum value of 60 shown in
Listing 8-4 creates a 12-second timer. The user has 12 seconds in which to make a decision, or the code shown in Listing 8-5 will automatically make the decision for the user.
The TD_Tick() event handler receives the Task dialog object in sender. To make it easier to interact with the Task dialog, the event handler code simply creates ThisTask to access the TaskDialog object.
The first check verifies that the ProgressBar is still in the TaskDialogProgressBarState.Normal
state. Otherwise, the count is over and the Task dialog will be
closing. This check is necessary to prevent possible race conditions
(where the code starts another loop before the check is made). During
testing, the example application would occasionally raise an exception
before the Task dialog automatically closed because the code would
attempt to update ThisTask.ProgressBar.Value beyond the maximum value or do something else that wasn't allowed. Using this check prevents the problem from occurring.
The second check determines what to do. If the ThisTask.ProgressBar.Value equals the ThisTask.ProgressBar.Maximum value, then it's time to pause the progress bar and close the Task dialog by calling ThisTask.Close(). The code automatically selects the most innocuous value, TaskDialogResult.Cancel, which means the user didn't have an opinion in this case. When ThisTask.ProgressBar.Value is less than ThisTask.ProgressBar.Maximum, the code simply increments the ThisTask.ProgressBar.Value property.